
快速入门
快速入门
在这个快速入门指南中,您将学习如何将智能合约部署到zkSync,并使用zkSync开发工具箱构建一个与之互动的dApp。
这就是我们要建立的东西。
- 一个存储问候信息的智能合约,并部署在zkSync上。
- 一个dApp来检索和更新问候信息。
- 用户将能够在智能合约上改变问候语。
- 默认情况下,用户将以ETH支付交易费用。然而,我们也将解释如何实现testnet paymaster,让用户用ERC20代币支付交易费用。
Note
请注意,在zksync-web3 ^0.13.0中引入了突破性变化。API层现在使用 "gas "操作,"ergs "概念只在虚拟机内部使用。
先决条件
yarn或NPM软件包管理器。我们推荐yarn,它是我们在前端项目中使用的。这里是Yarn的安装指南,以防你没有它。- 一个在L1上有足够的Göerli
ETH的钱包,以支付桥接资金到zkSync以及部署智能合约。 - 如果你想实现testnet paymaster,则需要zkSync上的ERC20代币。我们建议使用来自zkSync门户网站的龙头。
初始化项目和部署智能合约
- 初始化项目并安装依赖性。在你的终端运行以下命令。
mkdir greeter-example
cd greeter-example

# For Yarn
yarn init -y
yarn add -D typescript ts-node ethers@^5.7.2 zksync-web3@^0.13.1 hardhat @matterlabs/hardhat-zksync-solc @matterlabs/hardhat-zksync-deploy

# For NPM
npm init -y
npm i -D typescript ts-node ethers@^5.7.2 zksync-web3@^0.13.1 hardhat @matterlabs/hardhat-zksync-solc @matterlabs/hardhat-zksync-deploy
请注意,ZkSync插件需要使用Typescript。
Tips
当前版本的zksync-web3使用ethers v5.7.x作为同行依赖。与ethers v6.x.x兼容的更新将很快发布。
- 创建
hardhat.config.ts文件并在那里粘贴以下代码。
import "@matterlabs/hardhat-zksync-deploy";
import "@matterlabs/hardhat-zksync-solc";

module.exports = {
  zksolc: {
    version: "1.3.1",
    compilerSource: "binary",
    settings: {},
  },
  defaultNetwork: "zkSyncTestnet",

  networks: {
    zkSyncTestnet: {
      url: "https://zksync2-testnet.zksync.dev",
      ethNetwork: "goerli", // Can also be the RPC URL of the network (e.g. `https://goerli.infura.io/v3/<API_KEY>`)
      zksync: true,
    },
  },
  solidity: {
    version: "0.8.17",
  },
};
Tip
如果合约已经被编译,你应该删除artifacts-zk和cache-zk文件夹,否则,除非你改变编译器版本,否则它不会重新编译。
- 创建 "合同 "和 "部署 "文件夹。前者是我们将存储所有智能合约的
*.sol文件的地方,后者是我们将放置所有与部署合约有关的脚本的地方。 - 创建
contracts/Greeter.sol合约并在其中粘贴以下代码。
//SPDX-License-Identifier: Unlicense
pragma solidity ^0.8.0;

contract Greeter {
    string private greeting;

    constructor(string memory _greeting) {
        greeting = _greeting;
    }

    function greet() public view returns (string memory) {
        return greeting;
    }

    function setGreeting(string memory _greeting) public {
        greeting = _greeting;
    }
}
- 用以下命令编译合同。
yarn hardhat compile
- 在
deploy/deploy.ts中创建以下部署脚本。
import { Wallet, utils } from "zksync-web3";
import * as ethers from "ethers";
import { HardhatRuntimeEnvironment } from "hardhat/types";
import { Deployer } from "@matterlabs/hardhat-zksync-deploy";

// An example of a deploy script that will deploy and call a simple contract.
export default async function (hre: HardhatRuntimeEnvironment) {
  console.log(`Running deploy script for the Greeter contract`);

  // Initialize the wallet.
  const wallet = new Wallet("<WALLET-PRIVATE-KEY>");

  // Create deployer object and load the artifact of the contract you want to deploy.
  const deployer = new Deployer(hre, wallet);
  const artifact = await deployer.loadArtifact("Greeter");

  // Estimate contract deployment fee
  const greeting = "Hi there!";
  const deploymentFee = await deployer.estimateDeployFee(artifact, [greeting]);

  // OPTIONAL: Deposit funds to L2
  // Comment this block if you already have funds on zkSync.
  const depositHandle = await deployer.zkWallet.deposit({
    to: deployer.zkWallet.address,
    token: utils.ETH_ADDRESS,
    amount: deploymentFee.mul(2),
  });
  // Wait until the deposit is processed on zkSync
  await depositHandle.wait();

  // Deploy this contract. The returned object will be of a `Contract` type, similarly to ones in `ethers`.
  // `greeting` is an argument for contract constructor.
  const parsedFee = ethers.utils.formatEther(deploymentFee.toString());
  console.log(`The deployment is estimated to cost ${parsedFee} ETH`);

  const greeterContract = await deployer.deploy(artifact, [greeting]);

  //obtain the Constructor Arguments
  console.log("constructor args:" + greeterContract.interface.encodeDeploy([greeting]));

  // Show the contract info.
  const contractAddress = greeterContract.address;
  console.log(`${artifact.contractName} was deployed to ${contractAddress}`);
}
- 将
WALLET-PRIVATE-KEY替换为你用于开发的Ethereum钱包的私钥,并使用以下命令运行部署脚本。
yarn hardhat deploy-zksync
请求-速率超标消息
这个消息是由使用ethers提供的默认RPC端点引起的。为了避免这种情况,请使用你自己的Goerli RPC端点。你可以[在这里找到多个节点提供者](https://github.com/arddluma/awesome-list-rpc-nodes-providers)。
在输出中,你应该看到合同被部署到的地址。
恭喜你! 你已经部署了一个智能合约到zkSync Era Testnet 🎉。
现在你可以访问zkSync区块探索器,搜索你的合约地址,以确认它被成功部署。
本指南解释了如何使用zkSync区块探索器验证你的智能合约。
前端集成
设置项目
在本教程中,Vue将被用作首选的网络框架,但无论使用哪种框架,其过程都很相似。为了专注于使用zksync-web3SDK的细节,我们将提供一个模板,所有的前端工作都已经完成。最后一步是添加代码,与我们刚刚部署的智能合约进行交互。
- Clone it。
git clone https://github.com/matter-labs/greeter-tutorial-starter
- Spin up the project:
cd greeter-tutorial-starter
# For Yarn
yarn
yarn serve

# For NPM
npm install
npm run serve
默认情况下,该页面应该在http://localhost:8080上运行。在浏览器中打开这个URL,可以看到该页面。
连接到Metamask和桥接token到zkSync
为了与建立在zkSync上的dApps互动,将Metamask钱包连接到zkSync alpha testnet网络并将一些资金桥接到L2。
- 按照[本指南](./fundamentals/interacting.md#connecting tozksync-era-onmetamask)将Metamask连接到zkSync。
- 使用我们的portal来连接资金到zkSync。
- 使用faucet来获得一些测试的ERC20代币到你的账户。
项目结构
我们将在./src/App.vue中编写所有代码。几乎所有的前端代码都是开箱即用的,剩下的唯一任务就是填写TODO-s,与我们刚刚在zkSync上部署的合约进行交互。
initializeProviderAndSigner() {
  // TODO: initialize provider and signer based on `window.ethereum`
},

async getGreeting() {
  // TODO: return the current greeting
  return "";
},

async getFee() {
  // TODO: return formatted fee
  return "";
},

async getBalance() {
  // Return formatted balance
  return "";
},
async getOverrides() {
  if (this.selectedToken.l1Address != ETH_L1_ADDRESS) {
    // TODO: Return data for the paymaster
  }

  return {};
},
async changeGreeting() {
  this.txStatus = 1;
  try {
    // TODO: Submit the transaction
    this.txStatus = 2;
    // TODO: Wait for transaction compilation
    this.txStatus = 3;
    // Update greeting
    this.greeting = await this.getGreeting();
    this.retreivingFee = true;
    this.retreivingBalance = true;
    // Update balance and fee
    this.currentBalance = await this.getBalance();
    this.currentFee = await this.getFee();
  } catch (e) {
    alert(JSON.stringify(e));
  }
  this.txStatus = 0;
  this.retreivingFee = false;
  this.retreivingBalance = false;
},
在<script>标签的顶部,你可以看到应该填写部署的Greeter合同的地址和其ABI的路径的部分。我们将在下面的章节中填写这些字段。
// eslint-disable-next-line
const GREETER_CONTRACT_ADDRESS = ""; // TODO: insert the Greeter contract address here
// eslint-disable-next-line
const GREETER_CONTRACT_ABI = []; // TODO: Complete and import the ABI
安装 zksync-web3.
在greeter-tutorial-starter根目录下运行以下命令来安装zksync-web3和ethers。
# For Yarn
yarn add ethers@^5.7.2 zksync-web3@^0.13.1

# For NPM
npm i ethers@^5.7.2 zksync-web3@^0.13.1
之后,在App.vue文件的script部分导入这两个库(就在合同常量之前)。它应该看起来像这样。
import {} from "zksync-web3";
import {} from "ethers";

// eslint-disable-next-line
const GREETER_CONTRACT_ADDRESS = ""; // TODO: insert the Greeter contract address here
// eslint-disable-next-line
const GREETER_CONTRACT_ABI = []; // TODO: Complete and import the ABI
获取ABI和合同地址
打开./src/App.vue并设置GREETER_CONTRACT_ADDRESS常数等于部署greeter合约的地址。
为了与我们刚刚部署到zkSync的智能合约互动,我们还需要它的ABI。ABI代表应用二进制接口,简而言之,它是一个文件,描述了所有可用的智能合约方法的名称和类型,以便与之互动。
- 创建
./src/abi.json文件。 - 你可以从上一节的hardhat项目文件夹中的
./artifacts-zk/contracts/Greeter.sol/Greeter.json文件中得到合约的ABI。你应该复制abi数组并将其粘贴到上一步创建的abi.json文件中。该文件应该看起来大致如下。
[
  {
    "inputs": [
      {
        "internalType": "string",
        "name": "_greeting",
        "type": "string"
      }
    ],
    "stateMutability": "nonpayable",
    "type": "constructor"
  },
  {
    "inputs": [],
    "name": "greet",
    "outputs": [
      {
        "internalType": "string",
        "name": "",
        "type": "string"
      }
    ],
    "stateMutability": "view",
    "type": "function"
  },
  {
    "inputs": [
      {
        "internalType": "string",
        "name": "_greeting",
        "type": "string"
      }
    ],
    "name": "setGreeting",
    "outputs": [],
    "stateMutability": "nonpayable",
    "type": "function"
  }
]
设置GREETER_CONTRACT_ABI以要求ABI文件并设置Greeter合同地址。
// eslint-disable-next-line
const GREETER_CONTRACT_ADDRESS = "0x...";
// eslint-disable-next-line
const GREETER_CONTRACT_ABI = require("./abi.json");
与提供者合作
- 转到
./src/App.vue中的initializeProviderAndSigner方法。这个方法在与Metamask的连接成功后被调用。
在这个方法中,我们应该。
初始化一个
Web3Provider'和一个Signer'以与zkSync交互。初始化
Contract对象,与我们刚刚部署的Greeter合约进行交互。
- 导入必要的依赖性。
import { Contract, Web3Provider, Provider } from "zksync-web3";
- 像这样初始化提供者、签名者和合同实例。
initializeProviderAndSigner() {
    this.provider = new Provider('https://zksync2-testnet.zksync.dev');
    // Note that we still need to get the Metamask signer
    this.signer = (new Web3Provider(window.ethereum)).getSigner();
    this.contract = new Contract(
        GREETER_CONTRACT_ADDRESS,
        GREETER_CONTRACT_ABI,
        this.signer
    );
},
检索问候语
填入方法,从智能合约中检索问候语。
async getGreeting() {
    // Smart contract calls work the same way as in `ethers`
    return await this.contract.greet();
}
完整的方法现在看起来如下。
initializeProviderAndSigner() {
    this.provider = new Provider('https://zksync2-testnet.zksync.dev');
    // Note that we still need to get the Metamask signer
    this.signer = (new Web3Provider(window.ethereum)).getSigner();
    this.contract = new Contract(
        GREETER_CONTRACT_ADDRESS,
        GREETER_CONTRACT_ABI,
        this.signer
    );
},
async getGreeting() {
    return await this.contract.greet();
},
连接Metamask钱包后,你应该看到以下页面。
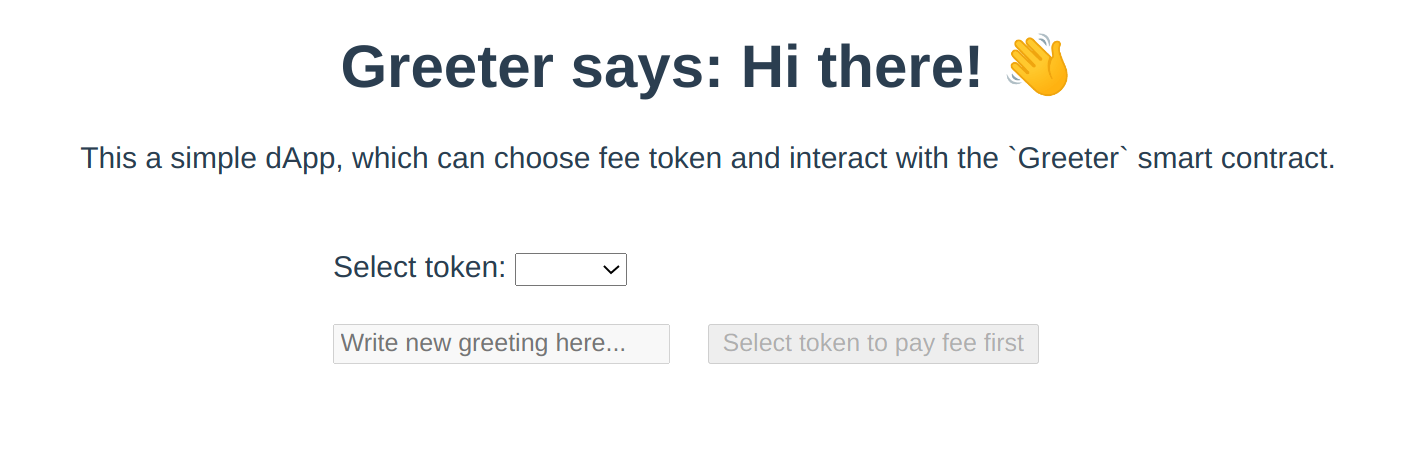
现在可以选择所选择的代币来支付费用。但是,目前还没有更新余额,yet。
检索代币余额和交易费用
检索用户余额的最简单方法是使用Signer.getBalance方法。
- 添加必要的依赖性。
// `ethers` is only used in this tutorial for its utility functions
import { ethers } from "ethers";
- 实现该方法本身。
async getBalance() {
    // Getting the balance for the signer in the selected token
    const balanceInUnits = await this.signer.getBalance(this.selectedToken.l2Address);
    // To display the number of tokens in the human-readable format, we need to format them,
    // e.g. if balanceInUnits returns 500000000000000000 wei of ETH, we want to display 0.5 ETH the user
    return ethers.utils.formatUnits(balanceInUnits, this.selectedToken.decimals);
},
- 估计费用。
async getFee() {
    // Getting the amount of gas (gas) needed for one transaction
    const feeInGas = await this.contract.estimateGas.setGreeting(this.newGreeting);
    // Getting the gas price per one erg. For now, it is the same for all tokens.
    const gasPriceInUnits = await this.provider.getGasPrice();

    // To display the number of tokens in the human-readable format, we need to format them,
    // e.g. if feeInGas*gasPriceInUnits returns 500000000000000000 wei of ETH, we want to display 0.5 ETH the user
    return ethers.utils.formatUnits(feeInGas.mul(gasPriceInUnits), this.selectedToken.decimals);
},
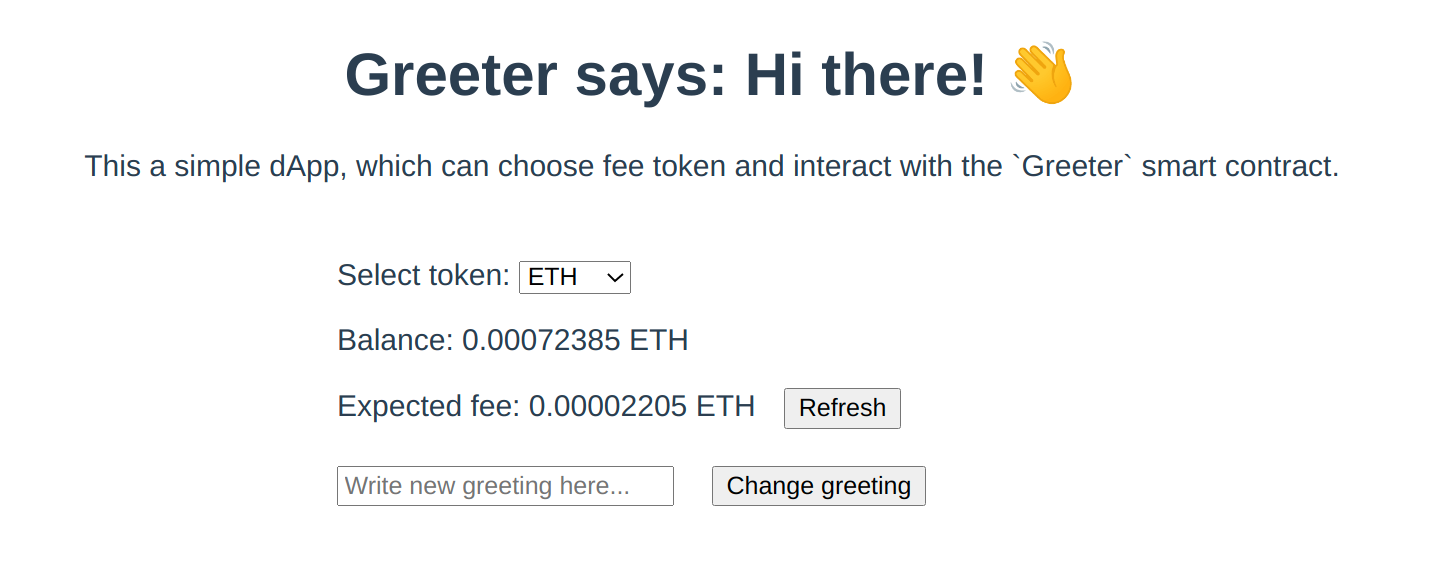
当打开页面并选择支付费用的令牌时,交易的余额和预期费用将被提供。
应使用刷新按钮来重新计算费用,因为费用可能取决于我们想存储为问候语的信息的长度。
也可以点击改变问候语按钮,但由于合同还没有被调用,所以不会有任何改变。
更新问候语
- 与智能合约的交互方式与 "ethers "绝对相同,但是,如果你想使用zkSync的特定功能,你可能需要在覆盖中提供一些额外的参数。
// The example of paying fees using a paymaster will be shown in the
// section below.
const txHandle = await this.contract.setGreeting(this.newGreeting, await this.getOverrides());
- 等待,直到事务被提交。
await txHandle.wait();
完整的方法看起来如下。
async changeGreeting() {
    this.txStatus = 1;
    try {
        const txHandle = await this.contract.setGreeting(this.newGreeting, await this.getOverrides());

        this.txStatus = 2;

        // Wait until the transaction is committed
        await txHandle.wait();
        this.txStatus = 3;

        // Update greeting
        this.greeting = await this.getGreeting();

        this.retreivingFee = true;
        this.retreivingBalance = true;
        // Update balance and fee
        this.currentBalance = await this.getBalance();
        this.currentFee = await this.getFee();
    } catch (e) {
        alert(JSON.stringify(e));
    }

    this.txStatus = 0;
    this.retreivingFee = false;
    this.retreivingBalance = false;
},
你现在有了一个功能齐全的Greeter-dApp! 然而,它并没有利用任何zkSync的特定功能。
Note
当你得到一个钱包_请求权限的错误时,会发生什么?
要解决这个错误,请刷新浏览器,或在浏览器上打开MetaMask扩容,点击_Next_或_Cancel_来解决。
阅读更多关于wallet_requestPermissions的信息,请访问metamask文档。
使用testnet paymaster支付费用
尽管以太坊是你唯一可以支付费用的代币,但账户抽象功能允许你整合paymasters,它可以完全为你支付费用,或者在飞行中交换你的代币。在本教程中,我们将使用testnet paymaster,它在所有zkSync Era testnets上提供。
testnet paymaster允许用户以任何ERC20代币支付费用,Token:ETH的汇率为1:1,即一个单位的代币兑换一Wei的ETH。这意味着小数点少于ETH的代币的交易费用会更大,例如只有6小数点的USDC。这是testnet支付系统的一个已知行为,它的建立只是为了演示目的。
主网上的付款人
🚨 测试网的支付系统纯粹是为了演示这个功能,不会在主网上使用。当在主网上整合你的协议时,你应该遵循你将使用的支付系统的文档,或者创建你自己的支付系统。
当用户决定用Gas支付时,`getOverrides'方法返回一个空对象,但是,当用户选择ERC20选项时,它应该返回付款人地址和它所需要的所有信息。这就是如何做到这一点。
- 从zkSync提供商那里检索testnet支付系统的地址。
async getOverrides() {
  if (this.selectedToken.l1Address != ETH_L1_ADDRESS) {
    const testnetPaymaster = await this.provider.getTestnetPaymasterAddress();

    // ..
  }

  return {};
}
注意,建议每次在进行任何互动之前,都要检索测试网付款人的地址,因为它可能会改变。
- 从
zksync-web3SDK的导入中添加utils。
import { Contract, Web3Provider, Provider, utils } from "zksync-web3";
- 我们需要计算出处理该交易需要多少代币。由于testnet支付宝以1:1的比例将任何ERC20代币兑换成ETH,所以金额与ETH金额相同,以wei计算。
async getOverrides() {
  if (this.selectedToken.l1Address != ETH_L1_ADDRESS) {
    const testnetPaymaster = await this.provider.getTestnetPaymasterAddress();

    const gasPrice = await this.provider.getGasPrice();
    // estimate gasLimit via paymaster
    const paramsForFeeEstimation = utils.getPaymasterParams(
          testnetPaymaster,
          {
            type: "ApprovalBased",
            minimalAllowance: ethers.BigNumber.from("1"),
            token: this.selectedToken.l2Address,
            innerInput: new Uint8Array(),
          }
        );

        // estimate gasLimit via paymaster
        const gasLimit = await this.contract.estimateGas.setGreeting(
          this.newGreeting,
          {
            customData: {
              gasPerPubdata: utils.DEFAULT_GAS_PER_PUBDATA_LIMIT,
              paymasterParams: paramsForFeeEstimation,
            },
          }
        );
    const fee = gasPrice.mul(gasLimit);

    // ..
  }

  return {};
}
- 现在,剩下的就是按照协议要求对paymasterInput进行编码,并返回需要的重写。
async getOverrides() {
  if (this.selectedToken.l1Address != ETH_L1_ADDRESS) {
    const testnetPaymaster =
      await this.provider.getTestnetPaymasterAddress();

    const gasPrice = await this.provider.getGasPrice();

    // estimate gasLimit via paymaster
    const paramsForFeeEstimation = utils.getPaymasterParams(
      testnetPaymaster,
      {
        type: "ApprovalBased",
        minimalAllowance: ethers.BigNumber.from("1"),
        token: this.selectedToken.l2Address,
        innerInput: new Uint8Array(),
      }
    );

    // estimate gasLimit via paymaster
    const gasLimit = await this.contract.estimateGas.setGreeting(
      this.newGreeting,
      {
        customData: {
          gasPerPubdata: utils.DEFAULT_GAS_PER_PUBDATA_LIMIT,
          paymasterParams: paramsForFeeEstimation,
        },
      }
    );

    const fee = gasPrice.mul(gasLimit.toString());

    const paymasterParams = utils.getPaymasterParams(testnetPaymaster, {
      type: "ApprovalBased",
      token: this.selectedToken.l2Address,
      minimalAllowance: fee,
      // empty bytes as testnet paymaster does not use innerInput
      innerInput: new Uint8Array(),
    });

    return {
      maxFeePerGas: gasPrice,
      maxPriorityFeePerGas: ethers.BigNumber.from(0),
      gasLimit,
      customData: {
        gasPerPubdata: utils.DEFAULT_GAS_PER_PUBDATA_LIMIT,
        paymasterParams,
      },
    };
  }

  return {};
},
- 要使用ERC20代币的列表,请修改以下一行。
const allowedTokens = require("./eth.json");
到下面一个。
const allowedTokens = require("./erc20.json");
erc20.json文件包含一些代币,如DAI、USDC和wBTC。
完成应用程序
现在你应该可以用ETH或任何可用的代币来更新问候语了。
- 选择其中一个ERC20代币来查看估计费用。
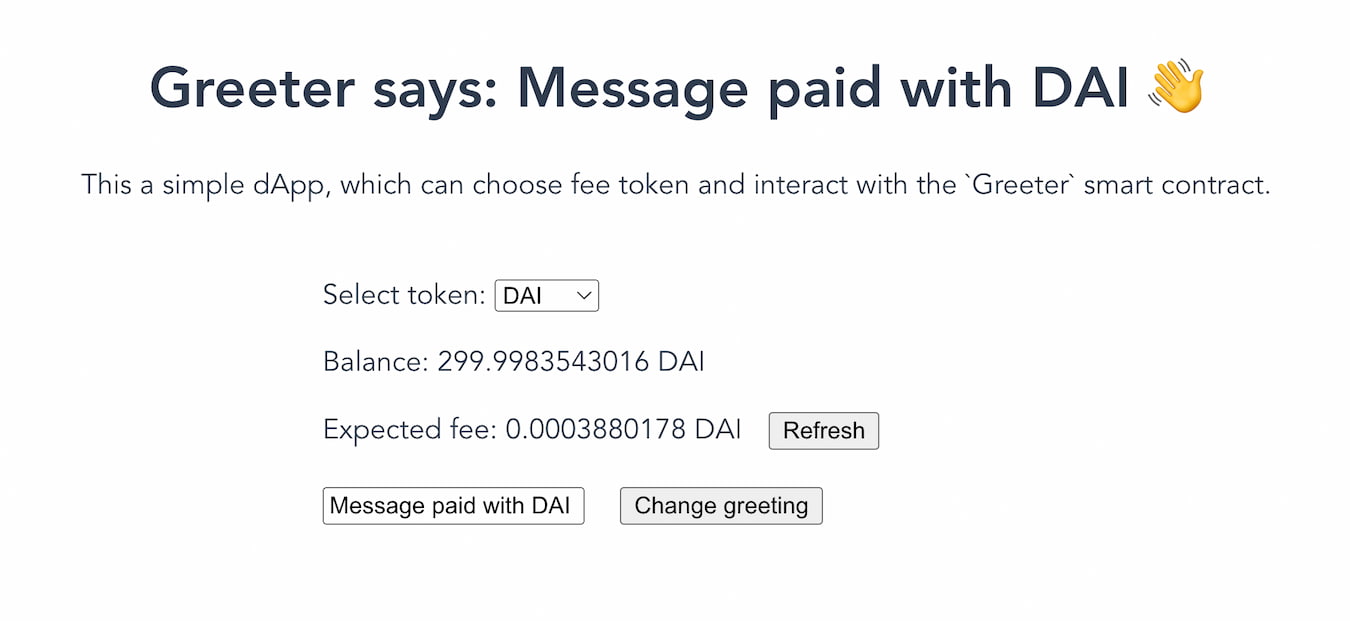
- 点击
改变问候语按钮来更新信息。由于提供了paymasterParams,该交易将是EIP712(更多关于EIP712的信息)。
- 点击 "签名",发送交易。
交易处理完毕后,页面会更新余额,可以查看新的问候语。
你已经用ERC20代币使用testnet paymaster支付了这笔交易 🎉。